This guide is intended for you if you use a Windows, Linux, or macOS workstation maintained by the University of Oulu ICT Services, with centrally managed FortiClient installed. FortiClient provides your device with a secure network connection.
FortiClient is no longer installed on your device by default, you can install it from Company Portal.
If you are a student or if you are installing FortiClient on a personal computer, the ZTNA service is not available to you. In that case, follow this guide.
If you have used a FortiClient VPN connection to access services of the University of Oulu or Oamk while traveling for work, from home, or from outside the campus network, you must have the new management server in use by April 20, 2026. This should already have been updated automatically on your computer via centralized management, but if for some reason the update has not been successful, you can enable the new management server yourself by following these instructions.
With the introduction of the new Endpoint Management Server (EMS), an even more secure and user-friendly alternative to VPN has become available alongside it: ZTNA (Zero Trust Network Access). VPN is still available when needed, but in many cases ZTNA replaces it. Therefore, VPN should mainly be used only when a service is not yet covered by ZTNA.
Contents of this guide
- Ensure that you are using a centrally managed FortiClient
- Enable the new management server (EMS)
- How to use ZTNA services
- How to open a VPN connection with FortiClient
- What to do in problem situations
- Information about FortiClient automatic updates
Ensure that you are using a centrally managed FortiClient:
Launch the FortiClient application. If you see “Zero Trust Telemetry” among the tabs, open it. The tabs are located on the left-hand side, and the “Zero Trust Telemetry” option is directly below the user profile. If FortiClient is under centralized management, the view will display “Centrally Managed by EMS”.
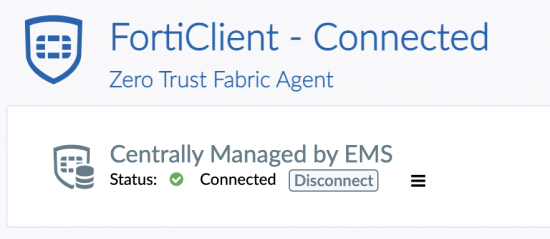
Image 1: FortiClient view indicating that the endpoint connection is under centralized management.
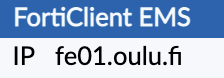
If the status is “Connected“, you can check whether you are connected to the new server by clicking the “hamburger” menu to the right of the Disconnect button. If the FortiClient EMS IP is fe01.oulu.fi, you are connected to the new server and do not need to follow the instructions for changing or enabling the management server.
All example images in this guide use FortiClient version 7.4.5. You may be using an older version, such as 7.2.7 or 7.2.10. If necessary, you can install version 7.4.5 from the Company Portal.
Changing / enabling the management server
This guide applies to Windows, Linux, or macOS workstations provided and managed by the University of Oulu or Oamk, which you sign in to using an account in the format username@univ.yo.oulu.fi or username@oamk.fi. FortiClient on your device should already be centrally managed, but if for some reason this is not the case, you can enable the management server yourself by following these instructions:
- Open the FortiClient application
- Check the status on the “Zero Trust Telemetry” tab
- The status can be Connected, meaning the management connection is working, or Unreachable, meaning the computer has no network connection. If FortiClient is not under centralized management, you will be prompted to register:

Image 2: FortiClient is not connected to centralized management.
- The status can be Connected, meaning the management connection is working, or Unreachable, meaning the computer has no network connection. If FortiClient is not under centralized management, you will be prompted to register:
- If the status is “Unreachable“, check your network connection. Once the network connection is working, continue from here:
- If the status is “Connected“, click the Disconnect button. This will display the registration view described in the previous section, prompting you to enter an invitation code. The invitation code depends on the operating system.
- FortiClient invitation codes for the new management server.
The invitation codes work only with University of Oulu and Oamk accounts. Copy the text under the name of the operating system you need and paste it into the appropriate field when enrolling FortiClient into centralized management:- Windows: _VjE6ZmUwMS5vdWx1LmZpOjgwMTM6ZGVmYXVsdDowODczMGQxZi1iZGM0LTQ0NDYtYTY0NS1kY2JmZDQwMTE2NmE=
- Linux: _VjE6ZmUwMS5vdWx1LmZpOjgwMTM6ZGVmYXVsdDpjNWNhMDAyNC1hNjcxLTRiNmEtYWU5ZC05NWZkMWU3NGZhOWQ=
- MacOS: _VjE6ZmUwMS5vdWx1LmZpOjgwMTM6ZGVmYXVsdDo5OWZkOTA1Ny1hYzRjLTRjMGEtYTM1YS1hNDdlZDU4NjBjZTg=
- Once you have pasted the code into the field in FortiClient, click Connect.
- After this, you need to confirm the sign-in. FortiClient will establish a connection to centralized management. Since you are already signed in to your computer, the sign-in prompt will (somewhat confusingly) appear in your web browser. The browser pop-up will say “This site is trying to open FortiClient Security Controls” and will indicate that the oulu.fi address on port 10443 is attempting to open this connection.

Image 3: A confirmation pop-up for opening the FortiClient Security console.
- Click “Open” (or alternatively, the Click here to complete the connection link shown in the browser), FortiClient will then confirm that the connection to centralized management has been successfully established.
- After the management connection has been successfully created, the FortiClient view will change slightly, and two new options will become available: ZTNA Destinations and Vulnerability Scan.
Note! If/when changing your password, you will have to reconnect to the EMS server.
Using the ZTNA service
Unlike with VPN, you do not need to open a separate connection to use ZTNA. You can access services from anywhere, just as if you were on the campus network.
You can view the services available via ZTNA on the “ZTNA Destination” -tab in FortiClient.
The list shows the service addresses together with their port numbers. For example, ovi.certia.fi:443 means that a browser connection opened to the site https://ovi.certia.fi is routed through a proxy, and an access control check is performed at the same time. The list may be long and is provided primarily for users’ information.
You can suggest new destinations to be offered via ZTNA by email at ict@oulu.fi.
Using the VPN service
You can access the VPN service via the “Remote Access” tab. In version 7.4, it looks like this
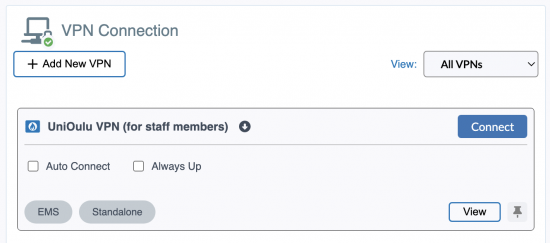
For University of Oulu users, the service is UniOulu VPN (for staff members), and for Oamk users, Oamk VPN (for staff members).
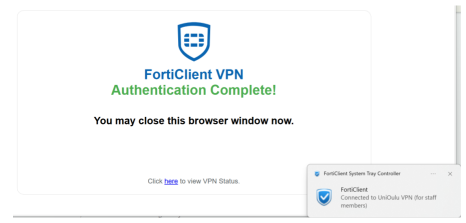
Click the “Connect” button next to UniOulu VPN / Oamk VPN. A notification confirming the successful connection will appear in your browser, similar to the following:
Common problems
Before troubleshooting in more detail, make sure that ZTNA is disabled when you are using VPN. Likewise, when using ZTNA services, the VPN connection cannot be opened. Based on experience, most issues have been caused by using both services simultaneously.
If you experience problems using ZTNA services in a browser, try accessing the service with a different browser. For example, in some cases Chrome and Edge have been found to work poorly when a Huawei 4G router is used for the network connection.
VPN connection cannot be established
- Check that your computer is connected to the network and verify on the FortiClient “Zero Trust Telemetry” tab that the management connection status “Connected“
- Make sure you can access the page https://myip.fi (note your IP address shown on the page)
- Try again, as there may have been a temporary disruption in the network connection to the VPN server
- Restarting the computer is always a good idea
- You can also go to the “Settings” tab in FortiClient, click the Clear Cookies button, and then restart the computer.
The VPN connection is established, but you cannot access the desired service (for example, due to a timeout or an error message referring to FortiClient ZTNA)
- ZTNA may be enabled, so disable it as follows:
- On the FortiClient ZTNA Destination tab, click Disable ZTNA.
The VPN is not in use and you are trying to access a service provided via ZTNA, but it does not work
- If, when using a service provided via ZTNA, you receive a notification like the following:
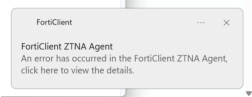
- Click the notification to view more detailed – though unfortunately often quite technical – information about the issue:
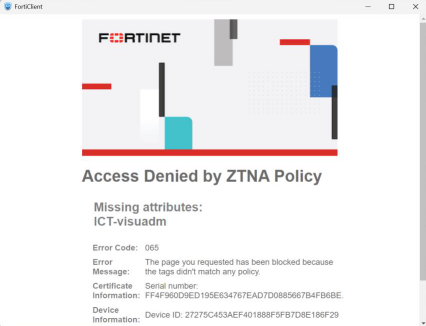
In the example, the problem is that the proxy server is blocking access to the target service because your user account lacks the required permissions.
Useful steps before contacting ICT Services for support
Below are a few things worth checking and noting, possibly to include later in a support request to ICT Services.
FortiClient endpoint status
Click the FortiClient profile icon in the upper left corner to open your user details. Some particularly useful information includes:
- “Status: Online/On-fabric“, where the status is either “Online” or “Offline“. This indicates whether your device currently has a working network connection.
- “On-fabric” means that, according to FortiClient, your computer is connected to the campus network. “Off-fabric“, in turn, means that you are outside the campus network, for example on the eduroam guest network or PanOulu. When you are on the campus network (On-fabric) the “ZTNA Destination” list may be much shorter and the VPN option may be completely unavailable, because access to many services is open within the campus network and a VPN is not required.
- “Zero Trust Tags” are essential information from an access-control perspective. These tags are determined by your user account’s group memberships or by the technical properties of your computer.
ZTNA status and available services
- On the ZTNA Destination tab check that the Enable/Disable toggle is in the desired position.
FortiClient version information
- You can check the FortiClient version on the “About” tab.
FortiClient updates
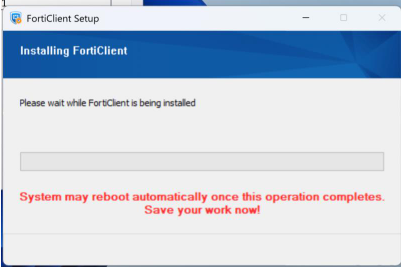
The FortiClient application on your workstation is centrally managed, and version updates are also handled centrally. You will be notified of an upcoming update to your computer in the following manner.
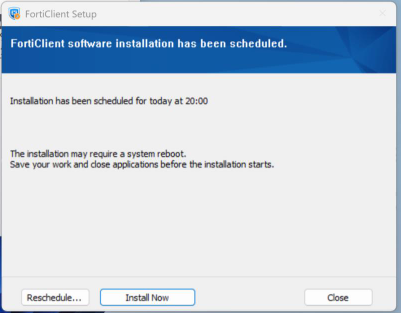
You can choose to approve the update to take place immediately, or schedule it for a more suitable time. The actual update does not take long, but during or after the update the computer will restart at least once.
While the update is in progress, you will see a notification similar to the one below, reminding you of the upcoming restart.