
University of Oulu and Oamk EXAM (exam.oulu.fi)
Contact user support (e-exam@oulu.fi)
News
EXAM summer break 2026
All EXAM rooms in the University of Oulu and Oamk are closed in July (1.7.2026–1.8.2026). Exam bookings cannot be made and support requests will not be answered from e-exam@oulu.fi during this time.
The EXAM room in Oulainen is closed 13.6.–9.8.2026.
NOTE: The summer break at Linnanmaa Examinarium has been shortened by a week. Exams can be taken at Linnanmaa from 27.7.2026 onwards.
If a student needs to take an exam in July, they can try to book an exam visit to another university, if their EXAM rooms are open in July. Check the EXAM visit instructions for other universities (link).
EXAM monthly maintenance break
As a rule, the EXAM maintenance break is scheduled for the first Wednesday of every month from 8 to 10 am.
Content
Basic instructions:
- What is EXAM?
- Types of exams in EXAM
- Creating an exam
- Creating a By Your Own Device (BYOD) -exam
- Grading exam
- Exporting grades as a file
- University of Oulu: Automatic grade transfer
- Software and attachments
- Editing questions
- Question types
- Question library
- Maturity exams
- Linguistic review for maturity exams
Additional instructions:
- Publication of answers and questions
- Automatic evaluation
- Speed grading
- Question-specific grading
- Identifying students
- Rules for students
- Extra time
- Interactive pen displays
- Paper exams
- Browsing reservations and submissions
- Printing a list of exam participants
- Releasing an exam for a retake
- EXAM room supervision
- Cheating and breaking the rules
- Performing an exam in an undisturbed examination room
- User rights
What is EXAM?
EXAM is a nation-wide system of flexible electronic examination, where a student takes an exam at a time of their own choosing in a video monitored EXAM room (also known as an examinarium) located at the university campus. Specially appointed EXAM supervisors monitor the EXAM rooms and provide reports to teachers about suspected cases of student misconduct and/or cheating. Students of the University of Oulu and Oamk can take exams in EXAM rooms at universities all over the country as EXAM visits. EXAM provides an alternative for conventional, time and space specific exam events, which the teacher has to supervise personally, and for unsupervised at-home exams, where the student has access to the internet and AI tools.
Log in to the EXAM of the University of Oulu and Oamk: EXAM (exam.oulu.fi)
Types of exams in EXAM
General exam
- General exams are open for everyone to enroll in. Normal course exams should be arranged as general exams.
- The maximum duration of a general exam is 3 hours (175 minutes). Note that the longer the duration of the exam, the harder it is for students to find free time slots for it.
- The student takes the exam in a remotely supervised EXAM room at a time they have reserved within the exam period.
- If you want the students perform the exam at the same time, use a BYOD exam (instructions).
- If a student has a need for special arrangements during an exam (for example a need for a longer duration) you must create a personal exam for this student.
- You can decide how many times the student can perform the exam before grading; 1, 2, 3, 4, 5 times or infinite number of times. The recommended number of possibilities to perform an exam is one. After grading, the student can always retake the exam if they wish.
- A student can always take a general exam as an exam visit at another university if they wish. See more information about EXAM visits (e-exam.fi).
Personal exam
- A personal exam is an exam for a specific student or a number of students. Other students cannot enroll in the exam.
- You must add students manually as participants in personal exams.
- Students take the exam in a video monitored EXAM room.
- For students who have a confirmed need for a longer 4 hour (235 minutes) duration, you need to create the exam as a personal exam.
- In a personal exam the number of possibilities to perform the exam is always one. If a student has to retake the test, you must create a new personal exam for the student.
- Maturity tests are created as personal exams.
- A student can always take a personal exam as an EXAM visit at another university if they wish. See more information about EXAM visits (e-exam.fi).
Joint exams
- With a joint exam, examiners from several universities can arrange an exam together. Joint exams are actively used for example in national doctoral examinations.
- Students perform the exams in remotely supervised EXAM rooms.
- Examiners are not allowed to create a joint exam by themselves. If there is a need for a joint exam, please contact e-exam@oulu.fi.
By Your Own Device (BYOD)
- A By Your Own Device exam offers the possibility to use EXAM outside the EXAM rooms.
- With BYOD you can arrange electronic examinations for example during lectures or as home exams.
- Students do not perform BYOD exams in remotely supervised EXAM rooms. Students perform BYODS using their own computer or using a borrowed computer.
- A BYOD can be arranged as unrestricted or restricted. In an unrestricted BYOD, the student can use the internet or files on their computer. In a restricted BYOD, the access to the files or the internet is restricted during the exam by Safe Exam Browser software. A restricted BYOD must always be supervised in person by the examiner in a class room or lecture hall.
- See instructions on how to create a BYOD exam.
Creating an exam
- Log in to EXAM (link). Choose your home organization on the Haka log in page. Fill in your username and password.
- If the system asks you to choose a user role, choose Examiner (Tentaattori in Finnish).
- Click Create new exam button on the top right corner of your desktop.
- Choose the Exam type:
- General exam: choose this, if you are creating an exam for a large amount of students.
- Personal exam: choose this, if you are creating a maturity exam or other exam for singular students.
- Read more about EXAM types.
- Choose EXAM room as the Exam mode. If you want to create a BYOD exam, see BYOD instructions.
- Click Create new.
- Fill in the information according to your university:
- University of Oulu: type in to the Course code field the code of the implementation (in the form XXXXXXXX-3XXX), to which the exam is related to. Choose the correct implementation on the list.
- Oamk: type in to the Course code field the code of the course, to which the exam is related to. Choose the correct course on the list.
- Add the Exam name.
- Course exam: name the exam so that all students on the course can easily recognize it. Every exam should have a unique name, so that it is easier to distinguish from other exams.
- Maturity exam: include the student’s name in the name of the exam, for example “Maturity/Andy Anderson”. Read more about maturity exams.
- Choose the languages by which the exam can be performed. It is recommended to choose one language only.
- Click Save. The exam is saved as a draft.
- Fill in the basic information:
- Examiners: examiners can edit the exam and add questions freely, as well as grade the students’ exam submissions.
- Evaluators: evaluators can only grade students’ answers to individual questions, but not entire exam submissions. Evaluators cannot edit the exam in any way.
- Special requirements for the exam computers: if specific software is needed to answer the questions in exam performed in an EXAM room OR you wish to disable some software for the exam, choose them here. Read more about software on EXAM computers.
- Exam attachment: attach a file to the exam for the student to open.
- Instructions visible for the student during the exam: add the instructions the students need to see during the exam. If needed, include specific instructions about study materials or devices (for example a calculator) that the student is allowed to bring the their exam station.
- Instructions visible for the student during the exam booking: add the instructions the students need to see before the exam. If needed, include specific instructions about study materials or devices (for example a calculator) that the student is allowed to bring the their exam station.
- Click Save and move to Questions.
- Add sections and questions:
- Sections: questions are always added inside sections. Name the first section and add questions inside it. You can add more sections with the Add new section button. There can be one section or more. A section can be, for example, a group of questions related to a specific subject. One section can include several questions. Sections are shown as their own pages for students during the exam.
- Questions: add questions. Read more about questions and question types.
- Click Save and move to Assessment settings.
- Fill in assessment settings:
- Type of examination: choose whole course grade, if the grade of the exam will determine the final grade of the course. If not, choose partial course grade.
- Grading scale: choose which grading scale is to be used to assess the exam submissions.
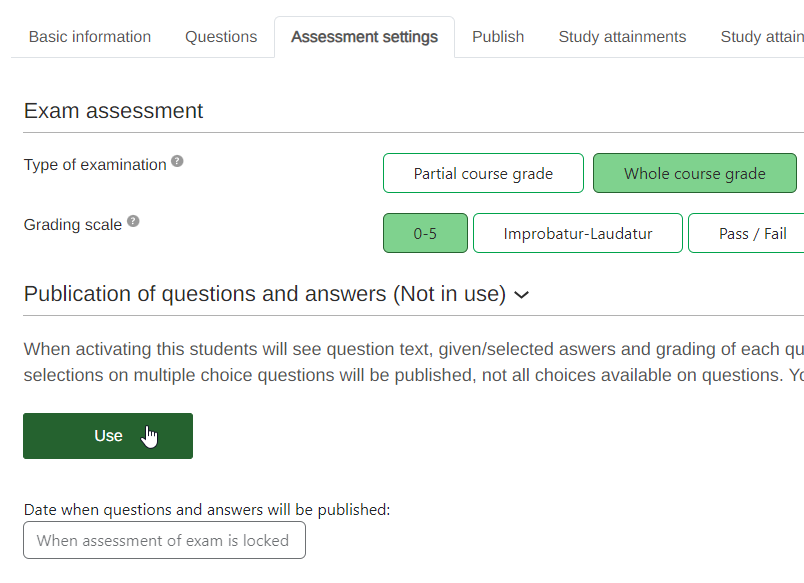
- Publication of answers and questions: use this, if you want that after evaluation the students will see question text, given/selected answers and grading of each question on their exam after assessment of each exam is locked. Read more about Publication of questions and answers.
- Click Save and move to Publish.
- Fill in publish settings:
- Exam period: the period of time during which students can perform the exam in an EXAM room. A recommendable exam period is 2-3 weeks.
- Note! The EXAM rooms are reserved for flexible examinations only. If you want your students to take the exam on the same day and at the same time, create a BYOD exam instead.
- Exam duration: how much time the student has to complete the exam after they begin.
- Set the duration only as long as needed, so that the exam reservations do not take up unnecessary space in the reservation calendar.
- Attainments before evaluation: determines how many times a student can independently perform the exam before evaluation. After the evaluation, the student can perform the exam again if needed.
- Personal exams: add the student as a participant by using the EXAM users list. Write down the name of the student on the Participant name field and choose the correct student. If there are multiple students with the same name, see instructions on how to identify students. If you can not find student’s name on the list, ask if they have logged in to the EXAM system for the first time yet.
- General exam: you can send a registration link for the students. Students can also search for the exam on the EXAM system by exam’s name, course code or the examiner’s name.
- Exam period: the period of time during which students can perform the exam in an EXAM room. A recommendable exam period is 2-3 weeks.
- When the exam is ready, publish it by clicking the Save and publish button. After publishing, the students can enroll in the exam. All exam information can not be edited after there are enrollments to the exam.
Read more about student’s EXAM enrollments (leads to students’ EXAM instruction page).
Creating a By Your Own Device (BYOD) -exam
BYODs are not performed in supervised EXAM rooms.
A BYOD can be performed using one’s own computer or a borrowed laptop.
The student does not get to choose the date and time of the exam freely, but teacher determines certain exam events, from which student chooses the most convenient for them.
BYOD can be unrestricted or restricted.
Note: You need a special user permission in order to create a BYOD exam. In order to receive the permission, contact the admin at e-exam@oulu.fi.
Maturity exams are never created as BYODs. Read more about maturity exams.
Unrestricted BYOD
An unrestricted BYOD is an exam in which the student is allowed to use their device without any access restrictions, for example to their own files or the internet. Take this into account when creating the exam questions.
Creating an unrestricted BYOD
- Log in to EXAM (link). Choose your home organization on the Haka log in page. Fill in your username and password.
- If the system asks you to choose a user role, choose Examiner (or in Finnish Tentaattori)
- Click Create new exam -button on the top right corner of your desktop.
- Choose Exam type (general or personal).
- Choose BYOD – unrestricted as the Exam mode.
- Click Create new.
- Fill in information:
- Teacher of University of Oulu: write down to the Course code -field the code of the implementation, which this exam is related to. Choose the right implementation on the list.
- Teacher of Oamk: write down to the Course code -field the code of the course, which this exam is related to. Choose the right course on the list.
- Name the exam so, that students can easily recognize it.
- Choose the languages by which the exam can be performed.
- Click Save. The exam is saved as a draft.
- Fill in the basic information:
- Examiners: add examiners, if you arrange the exam with someone else, and they need to be able to for example add questions in the exam.
- Evaluators: add evaluators, if other teachers will be evaluating attainments, but they don’t need rights to for example adding questions.
- Special requirements for the exam computers: not in use in BYOD. Leave empty.
- Exam attachment: you can add an attachment.
- Instructions visible for the student during the exam: add the instructions students need to see during the exam.
- Instructions visible for the student during the exam booking: add the instructions students need to see before the exam.
- Click Save and move to Questions.
- Add sections and questions:
- Section: questions are always added inside sections. Name the first section and add questions inside it. You can add more sections by the Add new section button. There can be one section or more. A section can be for example a group of questions related to a specific subject or a book. One section can include several questions. Sections are shown as their own pages for students during the exam.
- Questions: add questions. Read more about questions and question types.
- Click Save and move to Assessment settings.
- Fill in assessment settings:
- Type of examination: choose whole course grade, if the grade of the exam will determine the final grade of the course. Choose partial course grade, if the exam is related to implementation part.
- Grading scale: choose which grading scale is to be used to assess the attainments.
- Publication of answers and questions: use this, if you want that after evaluation the students will see question text, given/selected answers and grading of each question on their exam after assessment of each exam is locked.
- Click Save and move to Publish.
- Fill in publish settings:
- Exam period: set the date when the exam events will be arranged.
- Exam events: add Exam event (single or multiple) by clicking Add exam event button. Fill in date, starting time, maximum number of participants and instructions. Click Accept.
- Exam duration: determines how long student has time to complete the exam.
- Attainments before evaluation: determines how many times student can independently perform the exam before evaluation. After the evaluation student can perform the exam again.
- Personal exams: add student as a participant by using the EXAM users list. Write down the name of the student on the Participant name field and choose the right student. If there are multiple students with the same name, see instructions on how to identify students. If you cannot find student’s name on the list, ask them to log in the EXAM system once.
- General exam: you can send a registration link for the students. Students can also search for the exam on the EXAM-system by exam’s name, course code or Examiner’s name.
- When the exam is ready, publish it by clicking the Save and publish button. Students can now enroll into Exam events that you created.
Restricted BYOD
Note, that EXAM technical support is available only on working days during office hours.
A restricted BYOD can be a lecture exam, which you’ll supervise yourself.
In restricted BYOD student’s access to internet and computer files during the exam is blocked by Safe Exam Browser.
Restricted BYOD must always be performed in a room and time determined by the teacher and under supervision.
Creating a restricted BYOD
- Log in to EXAM (exam.oulu.fi). Choose your university on the Haka log in page and fill in your username and password.
- If the system asks you to choose a user role, choose Examiner (or in Finnish “Tentaattori”)
- Click Create new exam in the top right corner of the page.
- Choose Exam type (general or personal).
- Choose BYOD – restricted as the Exam mode.
- Click Create new.
- Fill in the Course code:
- University of Oulu: type in the code of your course implementation in Peppi (in the form XXXXXXXX-3XXX).
- Oamk: type in the appropriate course code (in the form XXXXXXXX).
- Name the exam so that the students can easily recognize it.
- Choose the languages in which the exam can be taken.
- Click Save. The exam is saved as a draft.
- Fill in the basic information:
- Examiners: examiners can edit the exam and grade students’ exam submissions.
- Evaluators: evaluators can score students’ answers to individual exam questions, but cannot grade whole submissions or edit the exam in any way.
- Special requirements for the exam computers: not in use in BYOD, leave empty.
- Exam attachment: add a file that the student can access during their exam.
- Instructions visible for the student during the exam: add the instructions students need to see during the exam.
- Instructions visible for the student during the exam booking: add the instructions students need to see before the exam.
- Click Save and move to Questions.
- Add sections and questions:
- Section: questions are always added inside sections. Name the first section and add questions inside it. You can add more sections by the Add new section button. There can be one section or more. A section can be for example a group of questions related to a specific subject or a book. One section can include several questions. Sections are shown as their own pages for students during the exam.
- Questions: add questions. Read more about questions and question types.
- Click Save and move to Assessment settings.
- Fill in the assessment settings:
- Type of examination: choose whole course grade, if the grade of the exam will determine the final grade of the course. If not, choose Partial course grade.
- Grading scale: choose which grading scale is to be used to assess the submissions.
- Publication of answers and questions: use this if you want that after evaluation the students will see question text, given/selected answers and grading of each question on their exam after assessment of each exam is locked.
- Click Save and move to Publish.
- Fill in publish settings:
- Exam period: determines the period of time during which students have to perform the exam in some of the EXAM rooms. A good length for an exam period is 2-3 weeks.
- Exam events: add Exam event (single or multiple) by clicking Add exam event button. Fill in date, starting time, maximum number of participants, instructions and an exam-event-specific password and SEB exit password. Click Accept.
- NOTE: The Exam Session-specific password is not visible to students; it is only provided to those students who have enrolled in the exam session once the exam session has started.
- The SEB exit password should not be given to students in exams; instead, it allows the supervisor to close the SEB browser on a student’s computer if there is a technical issue preventing the normal submission or interruption of the exam through EXAM.
- Exam duration: determines how long student has time to complete the exam.
- Attainments before evaluation: determines how many times student can independently perform the exam before evaluation. After the evaluation student can perform the exam again.
- Personal exams: add student as a participant by using the EXAM users list. Write down the name of the student on the Participant name field and choose the right student. If there are multiple students with the same name, see instructions on how to identify students. If you cannot find student’s name on the list, ask them to log in the EXAM system once.
- General exam: you can send a registration link for the students. Students can also search for the exam on the EXAM system by the exam’s name, course code or the examiner’s name.
- When the exam is ready, publish it by clicking the Save and publish button. Students can now enroll to the exam events you created.
Arranging the Exam event for a restricted BYOD
- Make sure that you have booked a room suitable for the examination.
- If you are not going to supervise the exam by yourself, make sure that there is someone supervising the exam.
- Get some exam papers to the exam room in case some students are not able to complete the exam by computer due to technical issues.
- Make sure that you have a device with you during the examination, which you can use for logging in EXAM and checking which students have submitted the exam.
- Send the students a link to students’ instructions about restricted BYOD in advance. You can also show the instructions for students in the examination room during the exam event.
- When students arrive to the exam event, ask them to follow the instructions.
- When all students have arrived an opened the SEB file, give them the exam event specific password. You defined this password in exam’s publish settings.
- Supervise the exam.
- Students report to you when they have submitted the exam. Open your exam in the EXAM system and go to Study attainments page. Check that the student’s name is in the Submissions in the assessment process list.
Grading exams
- Log in to EXAM (link) using your university credentials.
- If the system asks you to choose a user role, choose Examiner (in Finnish Tentaattori).
- You can view unassessed attainments on the Dashboard.
- On the Active exams tab you can view exams which still are on an active exam period. On the Unassessed column there is a number, which indicates the amount of unassessed attainments in this exam.
- On the Unassessed exams tab you can view unassessed attainments on exams, which are no longer on active exam period.On the Unassessed column there is a number, which indicates the amount of unassessed attainments in this exam.
- Click the number on the Unassessed column to open the exam’s Study attainments page. Submissions are divided into three categories:
- Submissions in the assessment process: Grading has not yet been done or is unfinished.
- Assessed submissions: Grading has been saved but can still be edited.
- Locked study attainments: Grading has been given and locked. Locked grades cannot be edited.
- Click the name of the student whose attainment you wish to grade.
- Score the exam answers. Answers are automatically scored, except for essay questions. You can override the automatic scores if you wish to do so.
- Scroll to the bottom of the page. Fill in Exam grade and other grading information:
- Whole course grade: whole course grade means that the exam grade defines the course grade.
- Oamk: whole course grades need to be registered in Peppi manually.
- University of Oulu: whole course grades transfer atomatically to Peppi, if set criteria are met.
- Partial course grade: partial course grade means that the exam grade does not define the course grade. Partial course grades need to be registered manually to Peppi if needed.
- Whole course grade: whole course grade means that the exam grade defines the course grade.
- Click Save changes. You can still edit the scores or the grading information.
- Multiple evaluators: the Examiner is allowed to lock the assessment after all evaluators have saved their assessment and scores. Each evaluator evaluates the attainments due to this instruction.
- If you are sure about the assessment, lock the assessment by clicking Save and lock the assessment button. You can no longer edit the scores or the grading information. The student receives a message about the finished assessment via email.
If a student’s exam submission gives you reason to suspect cheating, you can send a message to e-exam@oulu.fi to request EXAM supervisors to review the video recording.
Instructions for linguistic review for maturity exams.
Instructions for automatic evaluation.
Instructions for speed grading.
Instructions for question-specific evaluation.
Exporting grades as a file
The grades given in EXAM can be exported as a record into a CSV or Excel file. The file cannot be directly uploaded to Peppi, but you can use it as an aid in registering grades manually to Peppi if you wish.
- Go to your exam in EXAM
- Make sure that all the grades you wish to export are assessed and locked
- Go to the Study attainments tab.
- In the Locked study attainments list, select the students whose grade record you want to export. You can choose individual records, all exam records or only the records visible on the page.
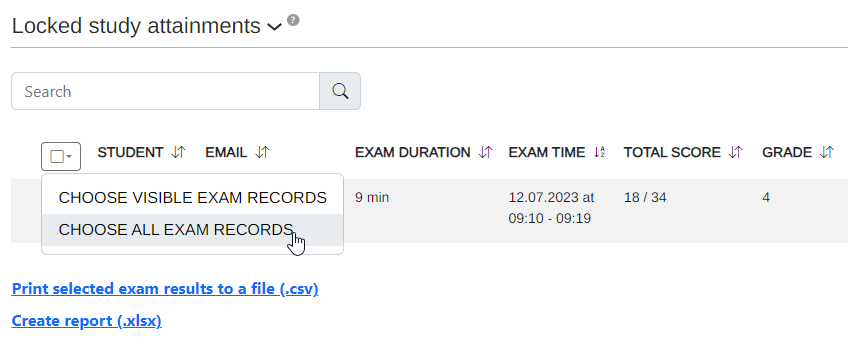
- Choose either Print selected exam results to a file (.csv) or Create a report (.xlsx) -button.
- Save the file on your computer.
- Register the records on Peppi according your university’s instructions:
University of Oulu: Automatic grade transfer
Grades in EXAM can be automatically transferred to the University of Oulu Peppi system. Grades are transferred when the student’s exam submission is assessed and locked. Oamk does not have automatic grade transfer.
The grades transfer every half hour. If the grade does not transfer right away, check again in 30 minutes.
The grades are transferred automatically only if specific criteria are met:
- The exam type in EXAM is Whole course grade
- NOTE: If you don’t want to use automatic grade transfer, select Partial course grade as the exam type.
- the student has an accepted implementation enrolment in Peppi
- the student has enrolled to the implementation by one study right
- the student’s study right is active on the date of the study attainment
- the student does not have an earlier assessment on another implementation of the same study unit
- the implementation in Peppi has no implementation parts.
If any of the criteria above are not met, the grade won’t transfer and the Examiner will receive an error message in their email. The email contains the reason of the error and instructions on how to fix it.
EXAM’s assessment page contains a field Additional information to be sent to the study register (not shown to the student). Content added to this field will transfer to Internal notes field in Peppi.
On retakes, a retake exam completed in EXAM will transfer in Peppi as a retake.
Software and attachments
All EXAM computers in the University of Oulu and Oamk EXAM rooms include the following software:
- Mozilla Firefox (access only to EXAM-server, internet not in use), Microsoft Word (no spell checker), Microsoft PowerPoint, Microsoft Paint, Windows Media Player, PDF-Xchange, 7-zip, Java, Java-, gcc/g++, Notepad++, C/C++, Codeblocks + Mingw, Mingw-translator, Catch-unit testing development, Dr. Memory, Cppcheck, Doxygen, Cpp reference offline version HTML book, NetBeans, Eclipse
Only some EXAM computers include the following software:
- Headphones (computers with headphones also include VLC Media Player), interactive display, Mathcad Prime, LTspice, Moodle Stack (alyoppi.mmg.fi), Microsoft Calc, Microsoft Excel, Microdicom Viewer, Aiforia, GeoGebra Calculator Suite, WinPython
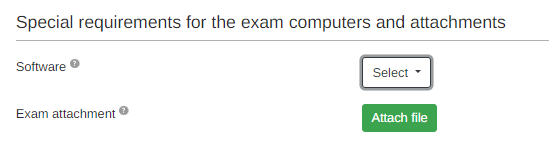
Always choose the software needed in your exam on the exam’s basic information. This way students can only book EXAM computers that have the required software.
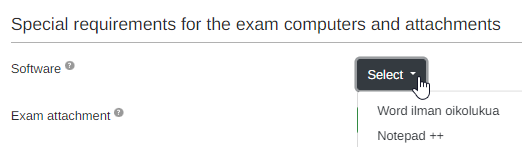
You can add one exam-specific attachment to the exam basic information. The attachment can also be a ZIP package, which includes several files. All Oulu EXAM computers can open ZIP files (by 7-zip).
Editing questions
- You can edit and remove exam questions on your exam’s Questions page by selecting the Settings button
- NOTE: Carefully edit questions which are used in many exams. If you edit a question, which is also used in another exam, the changes will appear on all exams in which this question is used.
- NOTE: If you have copied someone’s exam and edited the questions in this exam, the changes will be shown in both exams.
- Students’ study attainments have been protected from edits after completing the exam. If you edit exam’s question after a student has completed it, the changes will not affect the student’s attainment.
- If you edit a question in question library, the question changes in all of the exams in which the question is used in. Only the scores and question instructions don’t change.
Question types
See instructions about all the available question types at the EXAM consortium’s website:
- Essay question
- Fill-in excercise
- Multiple choice questions:
- Statement question
Additional information
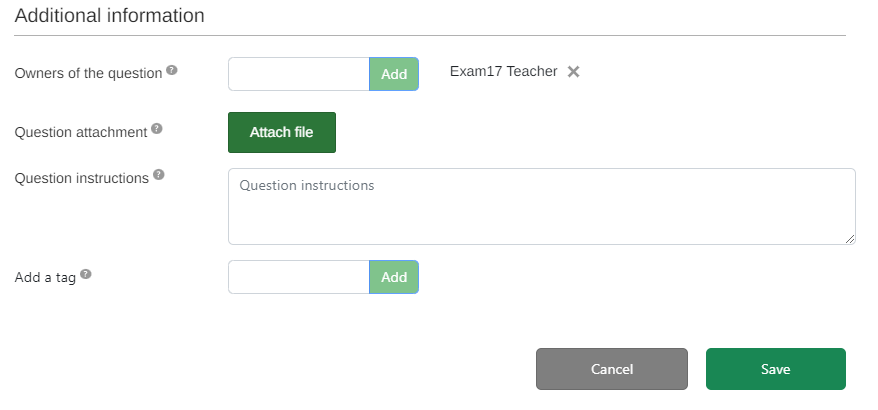
If you wish to share your question to someone else to use, make them an owner of the question. You can also attach files and include instructions to students for each question.
Question library
- All questions that you add in exams are automatically saved to the Question library.
- You can add questions from Question library to exams by clicking the Add questions from the question bank –button while creating the exam.
- The Question library can be found on the navigation menu:
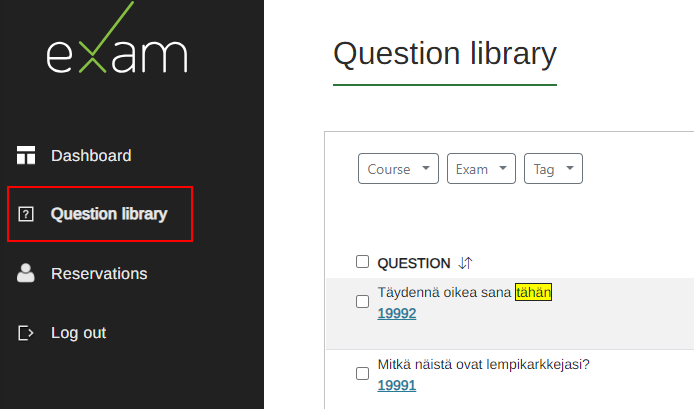
- You can search for questions in the Question library by the course code, name of the exam or by tags.
Tags
You can group questions and find them more easily in the question library by adding tags to them.
- Open Question library. Search for the question to which you want to add a tag.
- Click the question’s ID number.
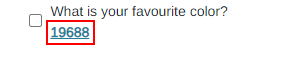
- Add the tag to Add a tag field on the Additional information.
- Click Save.
Maturity exams
- Log in the Oulu EXAM system on https://exam.oulu.fi. Choose your home organization on the Haka-log in page. Fill in your username and password.
- If the system asks you to choose a user role, choose Examiner (or in Finnish Tentaattori).
- Click Create new exam -button on the top right corner of your desktop.
- Choose personal exam as the Exam type.
- Choose Exam room as the Exam mode.
- Click Create new.
- Fill in information:
- Teacher in University of Oulu: write down to the course code field the implementation code, in which the maturity test is related to. Choose the right implementation on the opening list.
- Teacher in Oulu University of Applied Sciences: write down to the course code field code YYY10 Kypsyysnäyte. Choose the right implementation on the opening list.
- Name the exam as Maturity/Students name.
- Choose the languages which the maturity exam can be completed.
- Click Save. The exam is saved as a draft.
- Add the person who makes the linguistic review as Evaluator.
- Add Word (no spelling grammar) or in Finnish Word (ei oikolukua) as a software to the special requirements.
- Fill in instructions:
- Instructions visible for the student during the exam: write down the instructions that student needs to see during the exam.
- Instructions visible for the student during the exam booking: write down the instructions that student needs to see before the exam.
- Click Save and go to Questions.
- Name section(s).
- Add an essay question.
- Teacher in University of Oulu: add 450-600 as the response length in words recommendation.
- Teacher in Oulu University of Applied Sciences: add 400-600 as the response length in words recommendation.
- Click Save and go to Assessment settings.
- Fill in assessment settings:
- Type of examination: choose whole course grade.
- Grading scale: choose Pass-Fail.
- Publication of answers and questions: use this, if you want that after evaluation the students will see question text, given/selected answers and grading of each question on their exam after assessment of each exam is locked.
- Click Save and go to Publish.
- Fill in publish settings.
- Exam period: defines the dates during which student has to complete the maturity exam.
- Exam duration: choose 180 minutes (3 hours).
- Add student as a participant by using the EXAM users -list. Write down the name of the student on the Participant name -field and choose the right student. If there are multiple students with the same name, see instructions on how to identify students. If you cannot find student’s name on the list, ask them to log in the EXAM system once. EXAM requires a one-time log in from each user, before the user is to be seen on the list.
- When the exam is ready, publish the exam by clicking Save and publish. Student receives an e-mail about the published exam.
- After the language review has been completed, assess the content of the maturity exam by the Evaluating the exam -instructions.
- If the language review is not ready, the name of the person making the review is shown in red on the Assessment status -column on the exam’s Study attainments -page.
- When the persons name is shown in green, the review has been made.

- After the language review Examiner sees the feedback from the person making the language review. Examiner can still edit the feedback or add own feedback.
- Examiner gives the attainment a final grade and locks the assessment. After the assessment has been locked, the student sees the feedback and the assessment in their EXAM.
Linguistic review for maturity exams
- Log in the Oulu EXAM system on https://exam.oulu.fi. Choose your home organization on the Haka-log in page. Fill in your username and password.
- If the system asks you to choose a user role, choose Examiner (or in Finnish Tentaattori).
- Search for the maturity exam by the exam’s name on your Dashboard on the Active exams or Unassessed exams -tabs. You can start the language review, if there is number 1 or a higher number in the Unassessed-column.
- Click the number on the Unassessed-column.
- You will move to exam’s Study attainments. Your name is shown in red next to students, whom maturity exams you yet not have assessed.
- Open the attainment by clicking student’s name. Write down the score of the linguistic review. Also write down a verbal feedback.
- Go to the page foot.
- Find Assessment status. Your name stands in the Assessment status field. Choose Ready next to your name, when you are completed with the linguistic review. NOTE! Do not save.

- Go back to exam’s Study attainments -view. Make sure that your name is shown in green on the Assessment status -column. If your name is shown red, check, that you marked the assessment status ready for yourself.

Publication of answers and questions
Publication of answers and questions means that students see question text, answers and grading of each question on their EXAM after assessment of each exam is locked.
Only student’s own selections on multiple choice questions will be published, not all choices available on questions.
Publication of answers and question is activated on exam’s Assessment settings -page. You can activate or deactivate the functionality until the first assessment is locked.
Automatic evaluation
If your exam includes only questions which are scored automatically, you can use automatic final grading.
- Activate Automatic evaluation on the exam’s assessment settings page. Click the Use button.
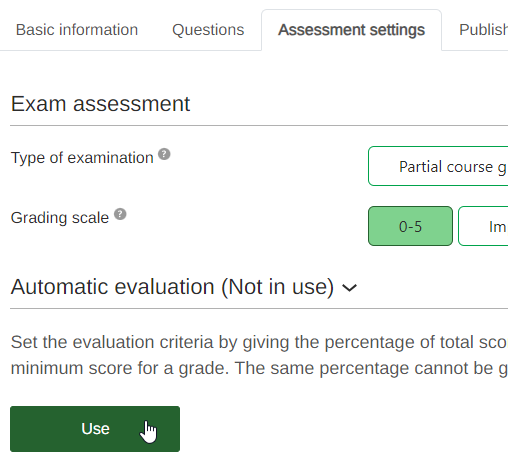
- Determine to the Percentage of the total score column the exam grades as percentages from the total points. On the left side to the Percentage of the total score column there is the exam grade and to the right side the points. The percentage values, which you choose to the middle column, determines how many points it is needed to gain each grade in the exam.
- NOTE: If you add questions to the exam later, you’ll have to update the percentages.
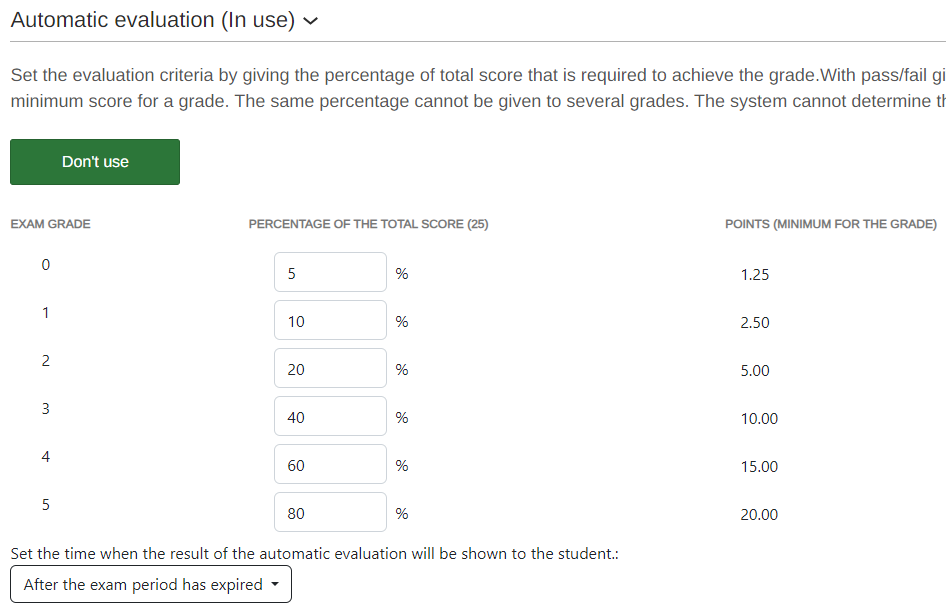
- NOTE: If you add questions to the exam later, you’ll have to update the percentages.
- Set the time when the result of the automatic evaluation will be shown to the student.
- Click Save and go to Publish. Determine the publish settings according to the general instructions.
- After students have submitted the exam, the amount of submitted answers is shown to you on the Dashboard in the Unassessed column. Click the number on the column.
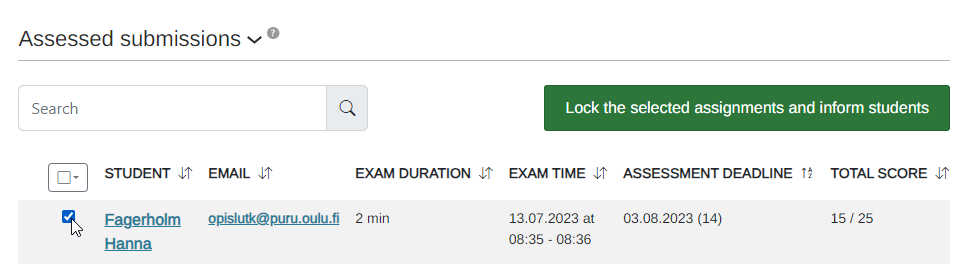
- The submitted answers are shown to you on the Assessed submissions list. Choose all submissions and click Lock the selected assignments and inform students button.
- After locking the submissions student receives an email about the finished assessment.
- If you don’t lock the assessment, EXAM will send you a reminder to your e-mail every week.
Speed grading
Speed grading can not be used if there are unassessed essay questions in the submissions.
Speed grading works best for exams that don’t include essay questions.
Speed grading can also be used if you want to assess submissions during the exam period, but fill in the final grades only after the exam period has ended.
- Go to your exam’s Study attainments page.
- Select Speed grading.
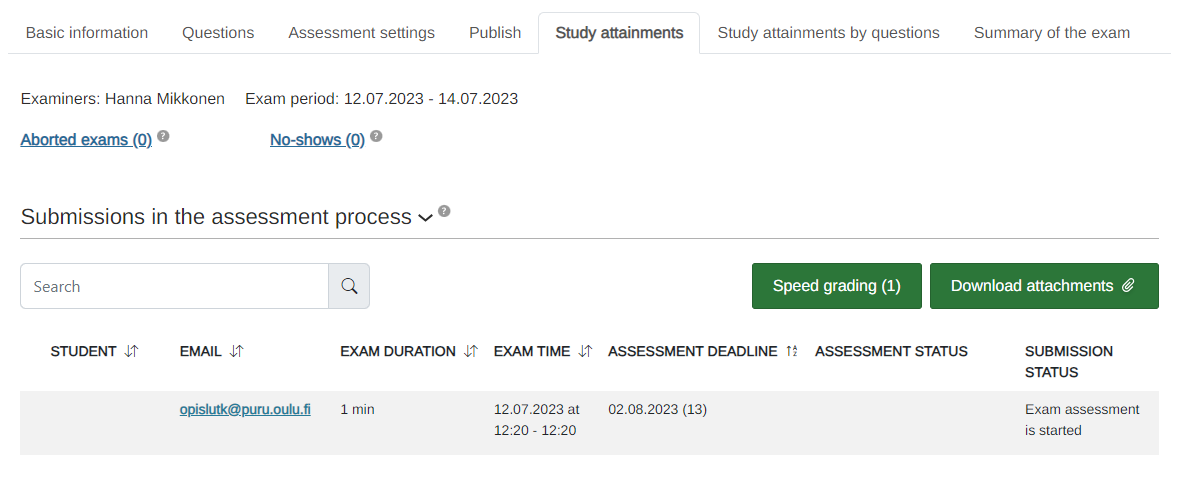
- Fill on the grades for each submission. You can also add feedback by selecting Edit.
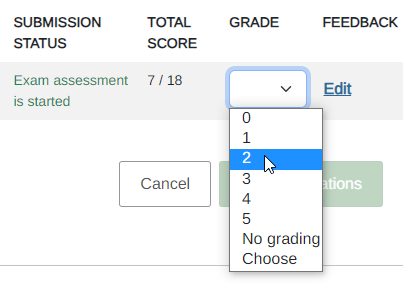
- Click Save evaluations.
Speed grading from a CSV file
You can mass-evaluate submissions in a CSV file.
- Choose the Speed grading button.
- Choose Create a CSV template for importing the grades.
- Open the file and paint the first column by clicking the letter A.
- Organize the information in columns by clicking Data and Text to columns.
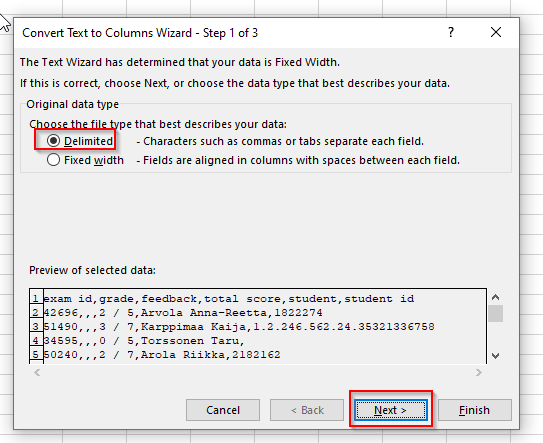
- A new window will open. Choose Delimited and continue by clicking Next.
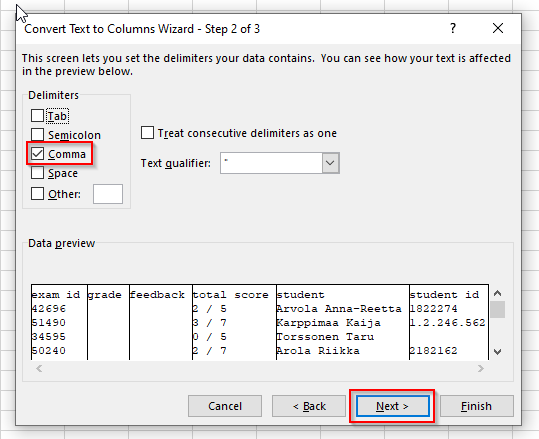
- Choose Comma as delimiter and continue by clicking Next.
- Click Finish.
- Add the exam grades on the Grades column and verbal feedback on the Feedback column.
- Save the file as CSV (.csv). If the grading is not finished, you can save the file on your computer and continue later.
- Return to E-exam and click Import grades from CSV file.
- Choose the CSV you have created and saved on your computer.
- Save.
Question-specific grading
In question-specific grading you can evaluate answers question by question instead of submission by submission.
Open question-specific grading by going to exam’s Study attainments by questions tab.
On the list there are all the essay questions. The number next to the question indicates how many answers to this question has been submitted and how many of them have been assessed.
In the view you can choose all the questions you want to assess. After choosing the questions click Assess the chosen questions.
In the assessment view you’ll find answers to all the questions. The questions have been shared to different tabs: Unassessed exams, Assessed exams and Locked.
- Examiner and Evaluator can assess the answers on the Unassessed exams tab.
- Answers on the Assessed exams -tab can be edited by Examiner and Evaluator, if the submission has yet not been graded.
- Submissions on the Locked tab are not editable.
Open the answer by clicking on the arrow icon next to the students name. When you are ready, go back to Study attainments page and lock the assessments.
Identifying students
Study right numbers are not visible in EXAM. In EXAM student’s ID is either Peppi ID or Student ID. Go to Peppi and check if one of these identifiers match with the ID shown in EXAM.
If you cannot find an identifier in Peppi that matches to the identifier in EXAM, you have the wrong student.
University of Oulu instructions about identifying students in Peppi.
Rules for students
Students are required to follow EXAM rules when taking an exam. Breaking the rules can lead to suspicion of cheating. Read all the rules in students’ EXAM instructions.
Important rules:
- The student is permitted to take only a student card or photo identity card (compulsory) and a storage locker key to their EXAM computer. All other items must be left in a storage locker.
- In paper exams or if using scratch paper, the student can take a pencil and an eraser to their EXAM computer. NOTE: Pencil cases are not allowed.
- Leaving the exam room and returning during the examination is forbidden. Toilet breaks are not allowed.
- Removing any papers from the EXAM room is forbidden. Exam papers must be put in the submissions box inside the EXAM room and scratch papers must be disposed of in the EXAM room recycling bin.
It is good practice to remind and encourage students to follow the EXAM rules by including a link to the rules in your exam’s instructions.
Special permissions for items
It is forbidden to take books or a calculator to an EXAM computer, but you can make a special permission for these if needed. In these cases you must include a mention about the special permissions in the exam instructions:
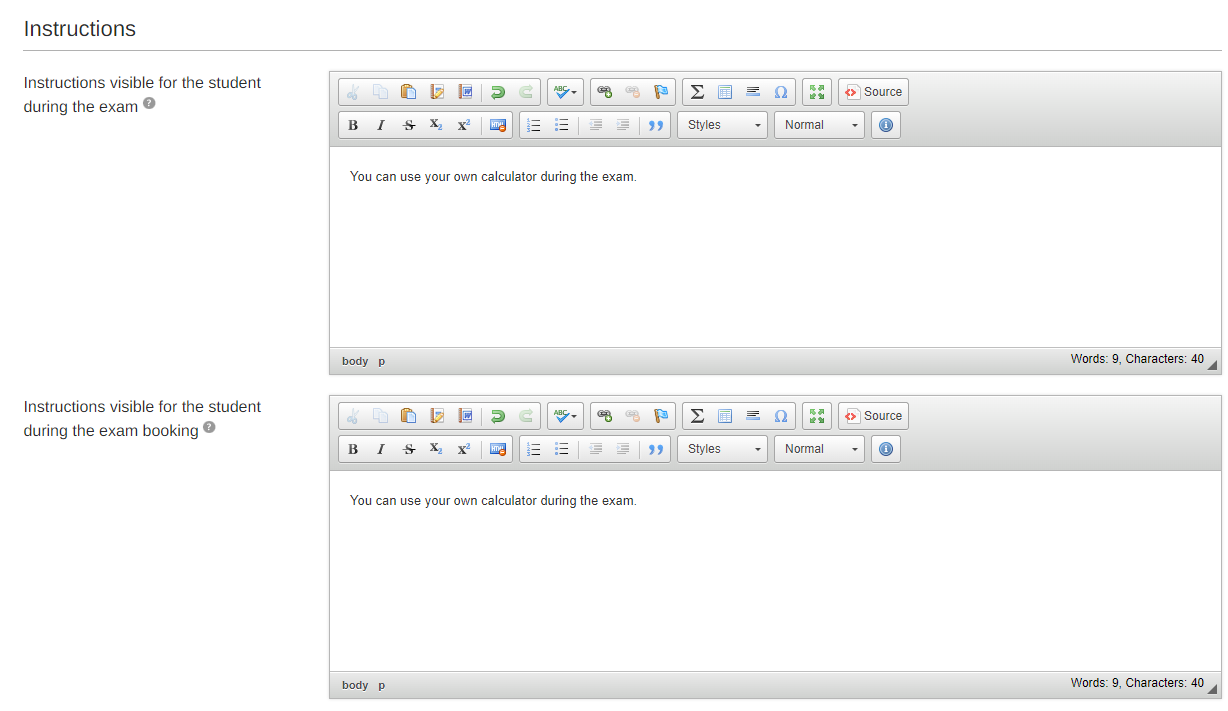
EXAM supervisors will not make reports of suspected cheating for items that are allowed in the exam instructions.
Extra time
Student, who has a certification about the need for extra time for completing exams, will be aranged a personal exam.
Student contacts teacher about the need for extra time. Create a personal exam with exam duration of 235 minutes (4 hours) for this student only.
Interactive pen displays
- Interactive pen displays are good when a good exam answer requires a special alphabet or drawing.
- In Oulu EXAM rooms there are 15 interactive pen displays.
- In Linnanmaa EXAM room there are 12 interactive pen displays.
- In Dentopolis EXAM room there are 3 interactive pen displays.
- All interactive pen displays are free to use for both students of UO and Oamk.
- Each EXAM point which is equipped with interactive pen display there are instructions to guide students in using the display.
If you create an exam which requires interactive pen display, follow the instructions below:
- Start creating the exam by the general instructions.
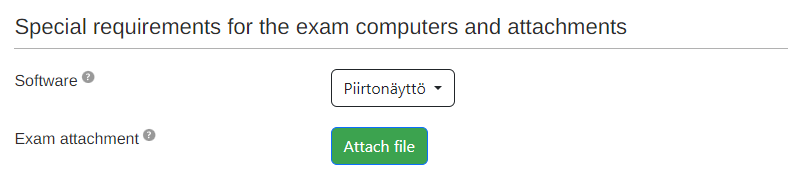
- In Special requirements for the exam computers and attachments choose Interactive pen display (or in Finnish Piirtonäyttö) as a software.
- ! If you skip adding the software in exam information, student’s reservation might go to a computer which is not equipped with interactive pen display.
- ! If you skip adding the software in exam information, student’s reservation might go to a computer which is not equipped with interactive pen display.
- Write down both to Instructions visible for the student during the exam and Instructions visible for the student during the exam booking this text:
- “Answers will be written/drawn on a Word-file by using the interactive pen display. Open Word and follow the instructions found next to the exam computer. Remember to save the attachment and attach it in EXAM to your exam answer by the Add Attachment -button. If you don’t add the attachment to EXAM, the file can not be returned after your examination.”
- Add at least one essay question in the exam. Write down the question text:
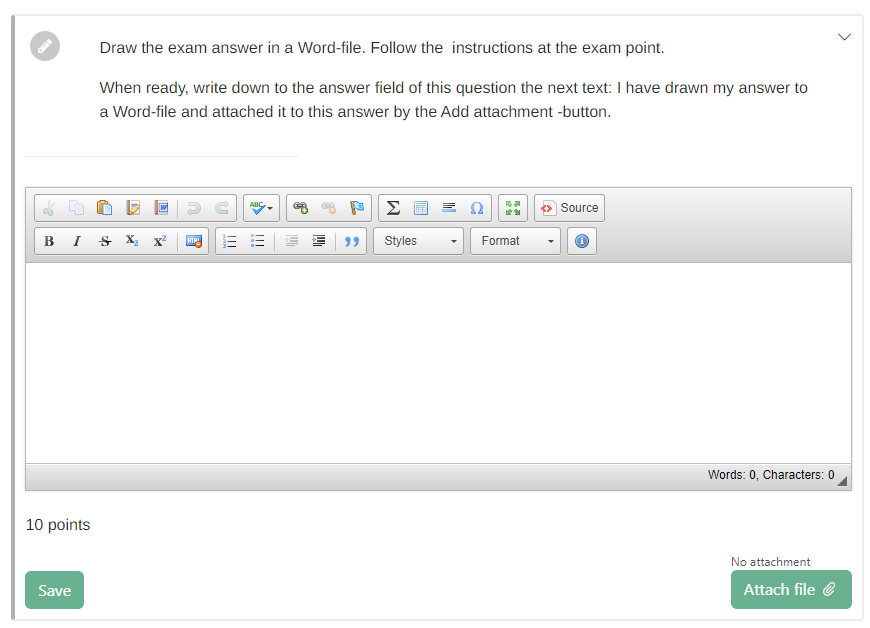
- “Draw/write the exam answer in a Word-file. Follow the instructions at the exam point. When ready, write down to the answer field of this question the next text: I have written/drawn my answer to a Word-file and attached it to this answer by the Add attachment -button.”
- Evaluate the answer by the evaluation intsrtuctions. When assessing, you can open the student’s answer file from the Download the attachment of the answer –button on the Submission assessment page.
An example of the view in student’s exam:
Paper exams
Paper exam means that the questions are in the EXAM system, but students answer on a paper and returns the answer paper in an envelope.
You can use paper exam if exam computers don’t include the needed software for completing the exam or if interactive pen display cannot be used instead of the paper.
Answer papers will not be transferred between campuses. Student always has to perform the paper exam at the campuses EXAM room, in which teacher’s main working office is located. Remember to add this information in exam instructions.
Students can complete paper exams in Linnanmaa, Dentopolis and Oamk Kontinkangas campus.
- Create an exam as a general or a personal exam.
- Write down to the Instructions visible for the student during the exam booking, in which campus student has to perform the exam (=the campus where your main working office is located in).
- Write down to the Instructions visible for the student during the exam…
- …that student has to write down the answers on a paper found in the EXAM room.
- …that student need to return the answer paper in an envelope to the postal box in the EXAM room.
- …that student needs to write down teacher’s internal address and name on the envelope.
- …your internal address and name.
! Note, that even though student answers on a paper, there must be at least one question in the EXAM, in which student answers to. This is how you’ll receive information, that student has submitted the exam and how you get to set the grades in EXAM.
Browsing reservations and submissions
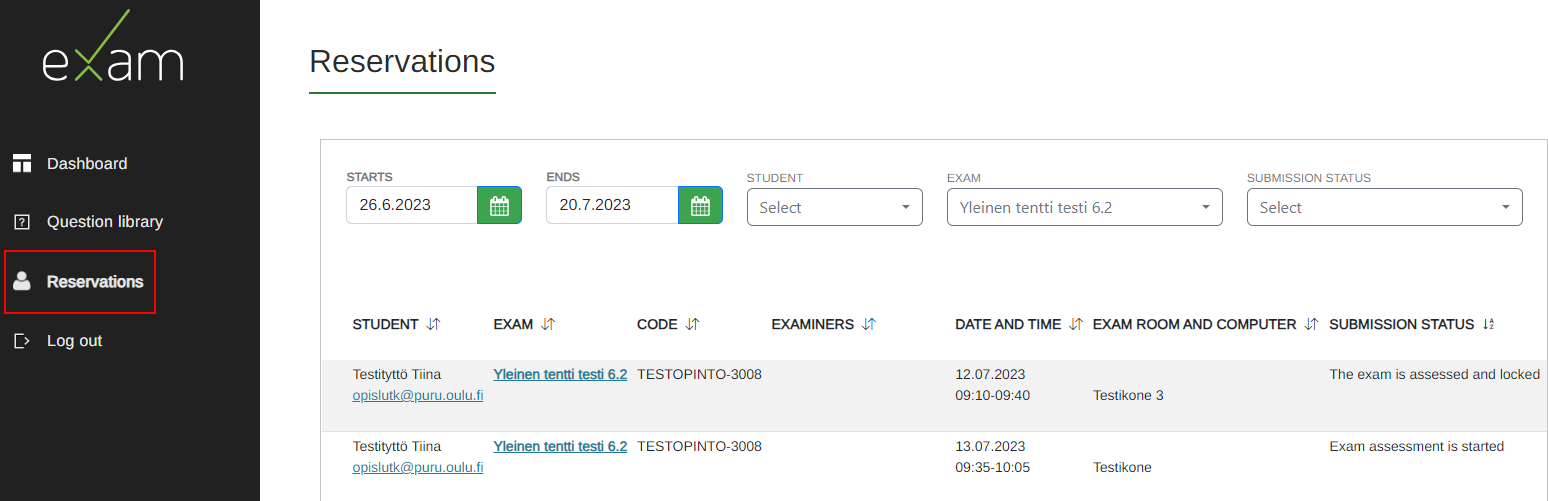
On the Reservations-page you can browse reservations made to your exams.
You can limit, which reservations you wish to browse. The limitation choices are by date, student’s name, exam’s name or submission status.
You can also start evaluating exam via this view. Click the exam’s name on the EXAM-column. Start evaluating by the evaluation instructions.
Printing a list of exam participants
- Go to EXAM’s Reservations-page.
- Limit the search by exam’s name.
- Limit the dates to the exam period’s start and end dates.
- Print the page by the three dots or the three vertical lines on the top right corner of your browser.
Releasing an exam for a retake
- In general exam’s publish settings there is Attainments before evaluation -choice, which determines, how many times students can perform the exam before the evaluation. The choices are 1, 2, 3, 4, 5 times or eternally.
- If the exam is allowed to perform independently several times before evaluation, students can complete the new attainments during a same day if they wish.
- Exams, which student submits or abort, counts as attainments.
- No-shows don’t wear out the amount of attainments. They are still saved in student’s attainment history.
- After student has used all the attainments, they can enroll in the exam only after teacher has evaluated the exam.
- ! Exam period must be active: student can not enroll in an exam, which’s exam period has been closed.
The examiner can release the attainments for a new enrollment, if student aborts the exam and all allowed attainments have been used. Or if the student has used all the attainments but wishes to retake the exam.
Instructions on how to release a submitted exam
- Go to EXAM’s Reservations-page.
- Find the student’s reservation by limiting the search by date, student’s name, exam’s name or submission status.
- Go to the right student’s row.
- Click the Release-button in the Submission status -column.
- Guide the student to make a new reservation.
Instructions on how to release an aborted exam
- Open exam’s information.
- Go to Study attainments -page.
- Open Aborted exams.
- Find the right student on the list.
- Click the Release-button.
- Guide the student to make a new reservation.
EXAM room supervision
- EXAM admins and supervisors supervise the EXAM rooms by video surveillance. In addition casual random checks are made to EXAM rooms.
- Supervisors are named persons from Faculty Service Teams.
- Supervise is performed by checking the video surveillance material every day. If needed, recorded sound material is also used to interpret vague situations. Supervisors and admins take care that the rules are followed.
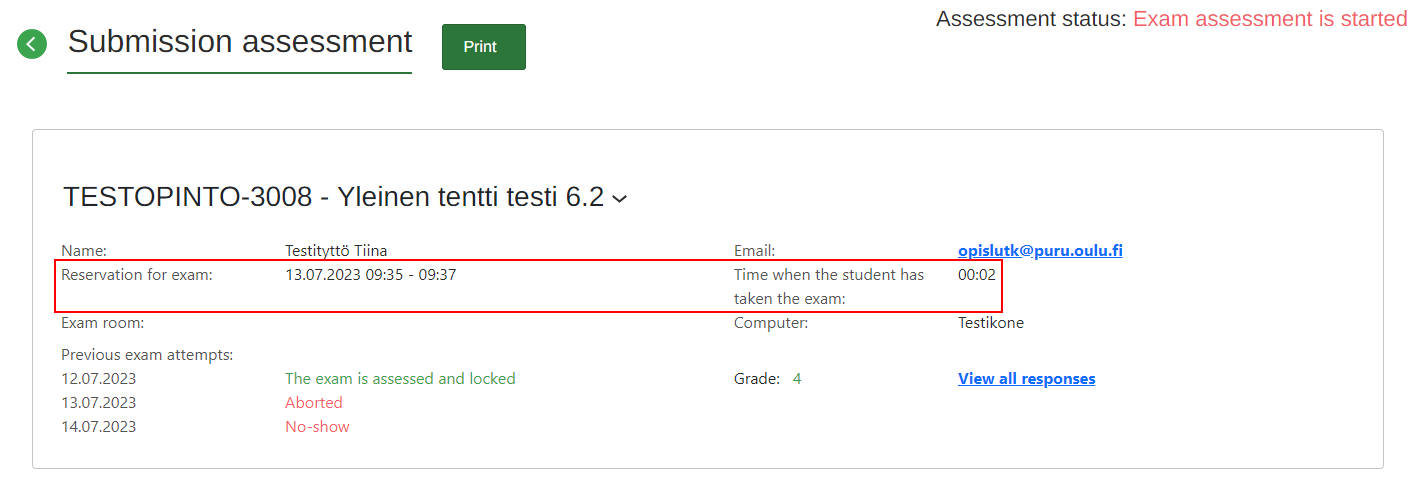
If you notice, that a student has submitted the exam in a noticeably short time in regards to the performance and you suspect for cheating, contact e-exam@oulu.fi. We’ll confirm the issue.
You can check the performance time on the Submission assessment -page at Reservation for the exam:
Cheating and breaking the rules
- Breaking the rules: if supervisors notice an act, which does not lead to cheating suspicion, supervisors send a notice to the student’s e-mail. If needed, teacher might also receive a copy of this message.
- A cheating suspicion: if the supervisors notice an act, which gives reason to suspect cheating, they inform EXAM admins. Admins check the situation and report suspicion forward.
- In University of Oulu admin fills in the cheating suspicion form. They send this form to the Examiner. Examiner reads the report and sends it forward to the Education Dean. Education Dean makes the final decision on the issue. Read UO instructions about Processing misconduct in studies.
- In Oulu University of Applied sciences admin fills in the cheating suspicion form. They send this form to jokot.oamk@oulu.fi and the teacher. Johtava koulutusasiantuntija makes the final decision on the issue.
- The Examiner has a right to see the video surveillance material in case of cheating suspicions related to their exams. Contact admins at e-exam@oulu.fi to do so.
Performing an exam in an undisturbed exam room
If needed, the teacher or the person in charge of a course can arrange for chance to perform an exam in an undisturbed exam room. Undisturbed examination is possible on Linnanmaa campus and in Kontinkangas. The use of these rooms requires for the student to have a certification of the need for performing exams undisturbed.
This kind of exams are created as personal unrestricted BYODs. Teachers supervise the exam themselves via a Teams meeting.
- Arrange the date and time for the exam with the student.
- Make a room reservation to a room on Outlook.
- Linnanmaa: “Häiriötön tenttitila”
- Kontinkangas: “Kontinkankaan hiljainen tenttitila K022”
- Create a personal, unrestricted BYOD:
- Log in to EXAM as an Examiner.
- Click New exam.
- Choose Personal exam as the exam type.
- Choose BYOD – unrestricted as the exam mode.
- Fill in the exam information and add questions.
- Fill in BYODs publish settings on Publish page.
- Exam period is the date when the exam takes place.
- Determine the duration of the exam.
- Add an exam event by clicking the Add exam event button. Fill in the date, time, maximum amount of participants and the exam instructions. Click Accept.
- Publish the exam.
- Create a Teams meeting and schedule it at the same time with the exam. Invite the student as a participant in the meeting.
- Guide student to…
- …go to the room in advance before the exam.
- …log in the computer in the room with their own login credits.
- …open Teams and join the Teams meeting.
- …share their screen in the Teams meeting.
- …open the camera and the microphone in the Teams-meeting.
- …open internet and go to www.exam.oulu.fi and log in EXAM with their own credentials.
- …wait for the exam to start.
- Join the Teams meeting yourself. Make sure that you see the student’s screen and camera and that the microphone is open.
- Supervise the exam.
- Make sure that the student submits their exam with the Save and submit button.
- Guide the student to log out of the computer and to leave the room.
User rights
User rights to person working for UO or Oamk: Examiner
- EXAM-järjestelmään kirjaudutaan oman korkeakoulun Haka-tunnuksilla.
- Opettajat operoivat EXAM-järjestelmässä Tentaattori-roolilla. Kun kirjaudut järjestelmään, järjestelmän tulisi tarjota sinulle kahta roolia: Opiskelija (Student) tai Tentaattori (Examiner). Jos sinulta puuttuu jokin näistä oikeuksista, ole yhteydessä järjestelmätukeen e-exam@oulu.fi.
- Tentaattori voi luoda uusia tenttejä, hallinnoida kysymyspankkia ja arvioida suorituksia.
User right of a person outside organization: UFO-user account (University of Oulu)
- Read more about UFO-user account (moves to Patio-personnel intra)
- If you have a UFO-account, do this: log in Oulu EXAM once. Sen a message to e-exam@oulu.fi and ask for Examiner rights. Write down your name and Faculty to the message. When the Examiner rights have been set, we’ll inform you.
- In Oulu University of Applied Sciences persons outside organization will not have user rights.