Files shared in the public sector online services must also be accessible: the law applies to all files published on or after 23 September 2018. Therefore, it would have been wise to prepare accessible files for some time already.
Note: if you are a student and the teacher has not specifically required accessibility in the assignment, the accessibility requirements do not apply to your exercise work: by default, students are only required to ensure that their thesis is accessible. However, the law also applies to materials provided by a student organisation (such as OYY and OSAKO) to its members.
Use accessible PowerPoint templates
Files based on the old templates (Oamk template used before September 2020 and University template used before November 2020) do not meet the requirements, so in principle, they should be corrected if they are to be shared online. The old templates have had contrast problems, meaning that the text has not been sufficiently distinguishable from the background. The new templates consider accessibility.
The University of Oulu templates can be found in Patio. Oamk templates can be found in Heimo, and Oamk templates for students can be found under Instructions in the Thesis section on the Study Guide page. You can copy the content of your old PowerPoint presentations to the new template: if you have used existing PowerPoint header and text layouts in your old slides, the procedure is relatively straightforward.
Use PowerPoint’s accessibility checker feature
Make it a habit to review your slideshow with PowerPoint’s Check Accessibility feature. It can reveal some accessibility issues. However, bear in mind that even if your file passes this test, it does not mean that the file is accessible: the feature can only check certain issues (situation in October 2023), it can remind you about
- images without alternative descriptions,
- slides without titles and possible duplicates (titles should be unique), and
- checking the reading order.
Together, the tips provided on this page and the above program-based automatic review would be a good routine to ensure accessibility.
- The title is the key component – but also consider the other text properties (e.g. the language setting)
- Use sufficient colour contrast
- Images alone are not enough, and decorative images must not interfere with the usability
- The order of the objects matters
The title is the key component – but also consider the other text properties
- The file name is the single most important information with respect to the presentation: give the file a descriptive name.
- The title is the key component of a slide: check that the title matches the content of the slide.
- If the same title continues on the next slide, separate it from the previous one (e.g. Same title 1/2 and Same title 2/2).
- Use PowerPoint’s title fields and list and table structures for lists and tables. Do not use tables for layout purposes, e.g. to create text columns.
- A large font size (e.g. 30) should be used for the body text. (See, e.g. Guy Kawasaki’s 10/20/30 rule)
- Pay attention to the intelligibility of the text: apply the separate instructions on text intelligibility also in your PowerPoint presentations.
- Set the language to match the language of the content.
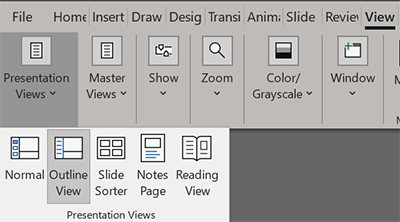
- This should be done in the desktop application’s Outline View section (View, Presentation Views: Outline View).
- Select all text in all the slides (e.g. by clicking anywhere in the slide list and then pressing CTRL+A).
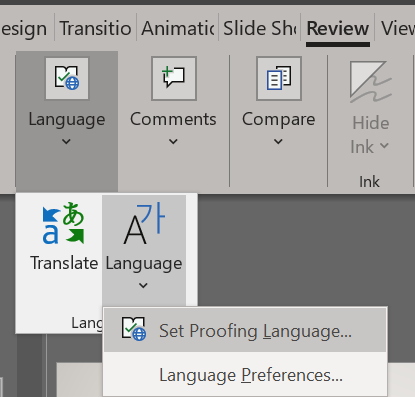
- Go to the proofing language settings (Review, Language: Language, Set Proofing Language)
Note: in Outline View, you will not see the contents of any text boxes that you have added separately in the slides (that are not included in the template). For these, the language must be changed one box at a time. Therefore, you should only use text boxes that are ready in the template. This way, the text content is shown in the outline view. - Set the proofing language to match the selected content and press the OK button to accept the selection.
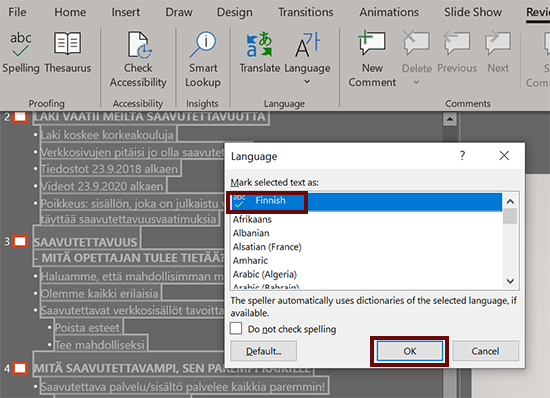
- You can also define the language for individual words, sentences, or paragraphs in the same way: just select the foreign-language part and define the language. The setting is applied to the selected item. Individual words do not need to be defined, but at least whole paragraphs should be defined if they differ from the other language of the file.
- This should be done in the desktop application’s Outline View section (View, Presentation Views: Outline View).
Use sufficient colour contrast
- Ensure sufficient contrast between the text and background. For example, Oamk orange and university pink used with white do not provide the required contrast, but black and orange or black and pink are sufficiently distinguishable.
- Do not use colour as the sole medium of information.
- In addition to colours, you can use different line types or fill patterns in graphs. It is easier for colour blinds, for example, to distinguish between lines and fillings.
- You can also connect a legend to a sector in a pie chart or a line in a line graph or, if there is room, add the legend directly on top of the pie chart sector.
- If you put the legend on a colour element, it must stand out from the background (contrast requirements).
- Note: there are exceptions to the contrast requirements, such as areal division maps based on colours, which can be used.
- Add border lines on the pie chart sectors to make them stand out from each other better. (Lines are not necessary if the contrast between the sectors is high enough.)
- Always provide the images with an alternative text description explaining the essential points (usually briefly). You can check the contrast using, for example, the following service: https://webaim.org/resources/contrastchecker/
- See also the separate instructions on contrast.
Images alone are not enough, and decorative images must not interfere with the usability
- If you add a background image under the text, make sure that the text stands out clearly from the background. A good rule of thumb is that if you have any doubts, do not add the image under the text.
- Add the background image in the master slide, not in the actual slide (or if you add the background image directly in the slide, remember to mark it decorative with an empty Alt text.)
- Images and graphs are good and definitely worth using: text alone is not as interesting and illustrative. If you share the file with others, add alternative texts to the images. (An empty alt text to decorative images.) Always end text descriptions with a full stop, except for such rare occasions where you want the screen reader to continue reading without pause, e.g. if the image is within the text.
- Note that if you use the PowerPoint file only to create a video of it (e.g. MP4), you do not need any alternative texts, as they will not be included in the video files. If you share the file in another format (PPTX, PDF), alternative texts must be provided.
- When writing an alternative text to a chart, list the information in a logical order, e.g. chronologically (on a timeline) or, in the case of pie charts, in order of size from largest to smallest.
- For the screen reader, it would be convenient to have the image caption as a title above the image. For example, think of a graph, the main point of which you briefly describe in the image caption. In this case, the image caption as a title serves the Alt text.
- Read the separate instructions on the properties of a good alternative text.
- If you include moving images such as videos in your PowerPoint, see the separate instructions on video accessibility. Note that no element should flash more than 3 times/s because flashing can cause a seizure or physical reaction.
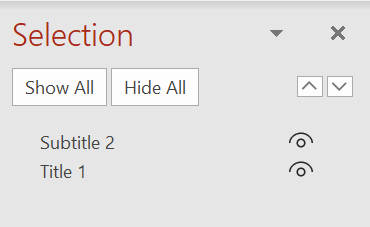
The reading order of the objects matters
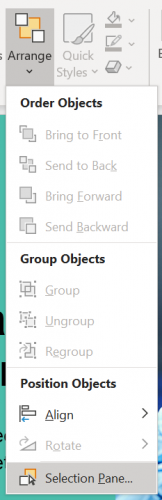
- Check the order in which the screen reader reads the slide objects: Select Home (Aloitus)/Arrange (Järjestä)/Selection pane… (Valintaruutu…) – the order should be logical and correspond to the visual order. The image caption + alternative text example mentioned above may be an exception to the rule.
Note that the element order list is here inverse to the order of reading, i.e. the bottom-one is read first, and the topmost last. In practice, the order is correct when the title is at the bottom. In a browser, Arrange (Järjestä) option does not necessarily appear in the ribbon due to insufficient space. In this case, you need to select it from the additional options (More Options or the so-called ‘three-dot menu’).
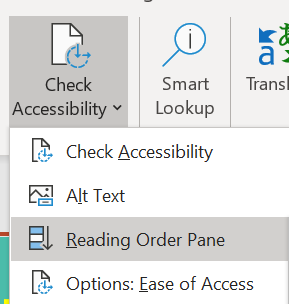
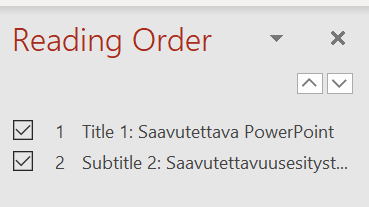
- The PowerPoint’s desktop version offers another, better option, where you can check the reading order in a logical order, with the top one being read first and the bottom one last: go to Check Accessibility (Tarkista helppokäyttöisyys) and open the Reading Order Pane (Lukemisjärjestysruutu).
Make your own templates accessible
If you create PowerPoint templates yourself, consider the accessibility requirements already then: a large part of PowerPoint presentations is shared online in the original PowerPoint format or converted into PDF files. They may also be displayed as part of a video or serve as a source for a video if the video is created directly in PowerPoint: even then, the colour requirements and the like should be considered. Even if the PowerPoint presentation is not to be distributed to the viewers as supplementary material but only appears in the recording, it still must meet all the visual accessibility requirements if it is to become part of the recording.
How to copy your old PowerPoint slides to a new, accessible template
- Create a new PowerPoint file using the new template.
- Open the old PowerPoint file, the content of which is to be copied to the new template:
- First, select all the content. This is easy to do, for example, in the slide view (View, Slide Sorter). Select one of the slides and then press CTRL+A (Windows) or CMD+A (Mac) to select all of them.
- Copy all the selected slides from the old file
by pressing CTRL+C (Windows) or CMD+C (Mac).
- Paste the slides to the new PowerPoint file.
- Select Keep Text Only (Säilytä vain teksti) in the Paste Options in the new presentation to exclude the layout templates of the old presentation and include only the text.
- If you press CTRL+V (Win) or CMD+V (Mac), you will paste the slides to the new presentation with the layouts included: in this case, the layout menu will include the layout templates of your old file, which should not be used in the future. Change the layouts of the slides to match those of the new template. After that, you can remove the layout templates that are no longer to be used. You can manage layout templates in the Master view.
- You can easily edit individual slides by selecting the slide and then the desired layout for it.
- You can find the layouts under Home, Layout.
Note: if the template contains many elements that cannot be copied directly to the new template layouts, it may be wise to create a completely new slide show starting from the beginning. In case of a single slide element not ending up in the right place on the new template, you can fix the issue as follows.
If you have selected a new layout template for a slide, and, e.g. the title does not appear where it is supposed to be:
- Select the title field in the new layout template and move it back (Home, Drawing, Arrange, Send to Back).
- The new header element is now under the incorrectly copied title, and you can select and copy the text of the title: select (highlight) the text and copy it.
- Next, click on the title element in the background and paste the text into it.
- Finally, check the accessibility of the slides (Review, Check Accessibility): ensure that the slide reading order is correct.
Tip: Promote accessibility knowledge by adding a link to this page at the end of your file. You can copy and paste the following example text:
This accessible file was created based on the How to make an accessible PowerPoint presentation instructions on ict.oulu.fi.