Google’s cloud service, Google Workspace for Education, is available with the credentials of Oulu’s higher education institutions. It consists of several different services, one of which is YouTube. YouTube is the world’s most well-known and popular video distribution platform.
You can watch content produced by others on YouTube, but you can also easily share your own videos. YouTube is primarily a public video platform, but it is also possible to restrict the visibility of videos: videos can be
- public,
- unlisted (hidden from search functions),
- or private (restricted to certain people, up to 50 users).
- Additionally, you can share videos on YouTube with your school’s credentials so that only users logged into Google’s cloud with the school’s credentials can view them.
Note that when you start using YouTube, you agree to YouTube’s terms of service. It states that your content is yours – meaning you retain copyright – but as long as your videos are on YouTube, you grant YouTube the rights to handle your videos “to provide, promote, and improve the service.” YouTube also processes private videos in its own processes (e.g., copyright scanning), meaning Google has access to your videos even if you haven’t shared the rights with others. Before uploading a video to YouTube – even privately – consider whether it is worth doing and if you have the necessary permissions to share the video.
Another noteworthy point is that video uploads have a default length limit of 15 minutes. You can upload longer videos once you verify your account according to Google’s instructions.
Upload a video to YouTube
Watch YouTube’s own instructional video on uploading videos to YouTube:
https://www.youtube.com/watch?v=6C4dEpT0rYg
You can also check out other comprehensive instructions from YouTube.
On this instruction page, you will find guidelines specifically intended for students of Oulu’s higher education institutions, which differ slightly from YouTube’s own instructional video (especially regarding logging in and sharing videos with others).
Share your video with others
- A) When you want to share a private video with individual people or students
- B) When you want to share an unlisted video that can be viewed without logging into Google
How to upload a video to YouTube:
- If you are not already logged in, log in to Google’s cloud service.
- Note: When logging in with your school credentials, you must first enter your email address in the format account@univ.yo.oulu.fi, account@oamk.fi (staff) / account@student.oulu.fi, account@students.oamk.fi (students), where account is your username. (See login instructions if needed).
- Go to YouTube. Alternatively, you can access the service from any Google page via the Google Apps menu (the “waffle menu”).

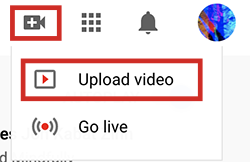
- To access the video upload view on YouTube, first select Create (camera icon in the upper right corner) and then Upload video.
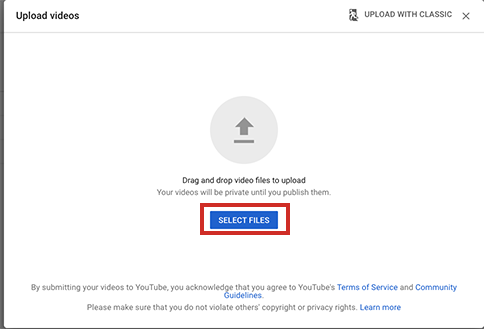
- In the Upload videos view, you can add a video to YouTube from your computer: To use the traditional file management view, press the Select Files button. Alternatively, you can drag the video file to the upload area.
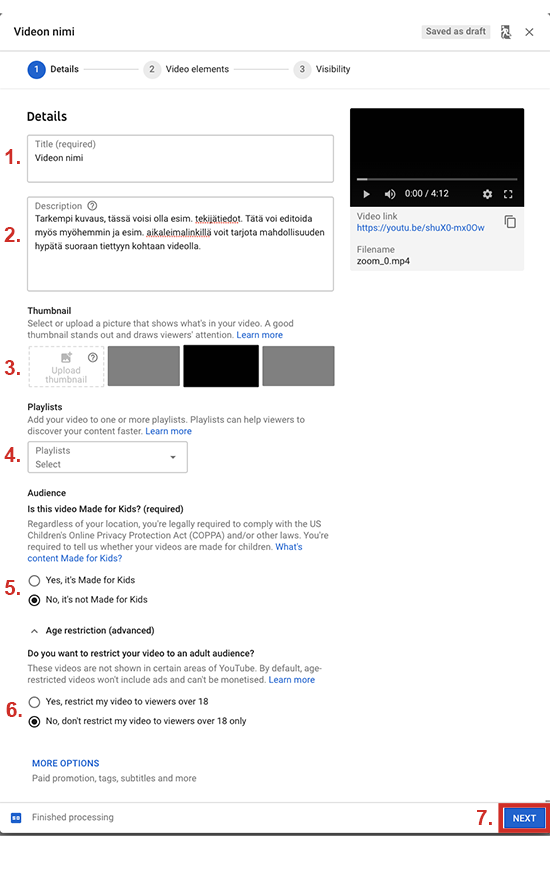
- Set at least the mandatory video settings immediately.
- At this stage, you must fill in at least these two fields:
- Give your video a title.
- Indicate whether your video is made for kids. Generally, videos are not intended for kids: This does not mean whether the video is prohibited for children, but whether children are the target audience. A video can be marked as made for kids if it contains nothing prohibited for children AND the content is interesting to children. This information is mandatory on YouTube, even for unlisted and private videos.
- You can also fill in other fields if you wish:
- In the description, it is good to include the video creator’s information. You can also add timestamp links for viewers to jump to specific points in the video.
- You can set a thumbnail for the video; if you do not add one, YouTube will select a still image from your video.
- If you have a playlist (playlist: image, item 4) ready for a lecture series or a specific course or theme, you can select it here if you want the video to be part of a recommended series. (You can edit your playlists in the YouTube channel’s playlist view.)
- Additionally, you can mark if your video is restricted to viewers over 18.
- Once you have filled in at least the mandatory information, you can continue to additional options (see YouTube’s own instructions for other additional options: Step 2, selecting additional settings), or you can directly press the Next button. You can change all information later in YouTube Studio.
- At this stage, you must fill in at least these two fields:
- You can skip the next Video elements step: you cannot even complete it until YouTube has finished processing your video. You can leave the end screen and link cards (cards) entirely if you wish. If you want to add an end screen and/or link cards that act as links to other videos or YouTube channels, you can do so. (See an example of an end screen from an ict.oulu.fi instructional video with links to other videos.)
- Set the video’s visibility:
When uploading a video, you must immediately decide its visibility. You have these options:- Public. Public videos can be accessed by anyone. The video can also be found through YouTube and Google search and appears in the public listing of your YouTube channel. Public videos are visible on your channel even to users who are not logged into YouTube.
- Unlisted. Unlisted videos can be accessed by anyone with the link. You must provide users with a direct link to your video for them to watch it. You can send the link via email or share it elsewhere: for example, you can embed the video in Moodle. This is user-friendly (no separate login required). Unlisted links are not found in Google or YouTube search, nor do they appear on your YouTube channel page. It is good to understand that users may share the video link further, to a larger audience than you might have intended. This cannot be technically prevented, but you can ask users not to share your video links further.
- Private. Private video links work only for specific users. To give users the link, you must separately share the video with the email addresses they use to log into their Google account. A user can watch the video only when logged into their Google account. Everyone can log into Google’s services with their school credentials. Google’s own Gmail addresses also mean that the person has access to a Google account. You can share a private video with up to 50 individually named people OR all Oamk/UO members. Embedding a private video in Moodle, for example, is possible but not very practical: the video would work directly only for those users who are already logged into YouTube and you have shared the video with them.
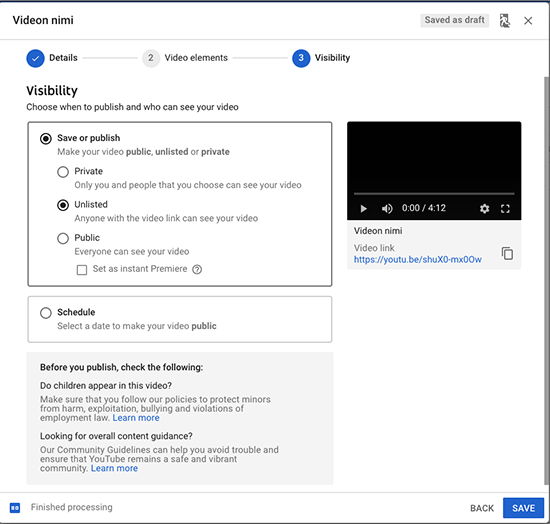
- Finally, press the Save button. Your video is now on YouTube! If necessary, wait for the video to be processed. Especially with long videos, they may not be immediately viewable.
How to share a video you uploaded to YouTube with others:
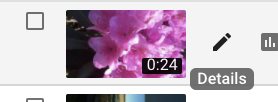
You can find the video in your video list in YouTube Studio.
A) When you want to share a private video with individual people or students
- Select the Details function (pencil icon) in the video list.
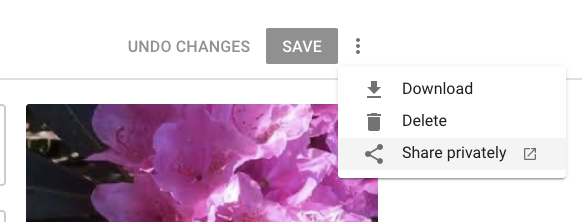
- Then select the Options menu (the three dots icon located in the upper right corner) and choose Share privately.
- This will open the Share with others view.
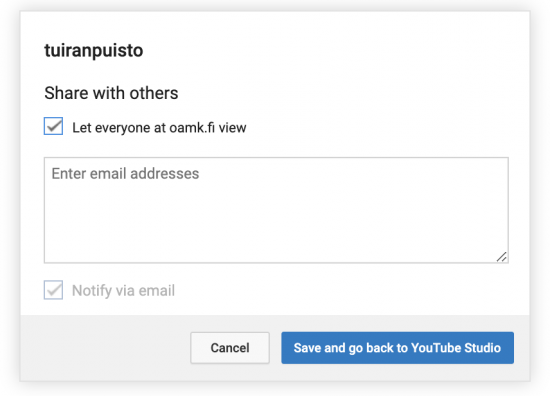
- If you want to share the video with all Oamk/university members, check the box for Let everyone at oamk.fi/oulu.fi view.
You can also share the video with up to 50 individual users.- If you want to share the video with individual people, their email addresses must be in short form, meaning account-prefixed addresses work, but firstname.lastname-type addresses do not.
- Note that email lists do not work because Google does not know their recipients: the addresses must be individual email addresses.
- You can also share the video with Gmail accounts and users from other organizations that use Google Workspace. (If necessary, ask your target audience for their Google addresses.)
B) When you want to share an unlisted video that can be viewed without logging into Google:
An unlisted link works just like a public one; the only difference is that an unlisted video does not appear on your channel and cannot be found through YouTube’s search engine.
You can get the embed code from YouTube by first opening the video you want to share and selecting Share from the options below the video, then choosing where you want to share it (e.g., Twitter or Facebook). The link in the browser’s address bar also works as is, so you can, for example, paste it into an email. Note that in Moodle, a YouTube link pasted directly into the text is automatically embedded on the page by default. (if you want YouTube links to appear as regular links in Moodle, change your Moodle course settings). YouTube users can also prevent their videos from being embedded on other sites on a per-video basis, in which case the link must be opened directly on YouTube and cannot be embedded on another site.
If you try to share a private video using the methods mentioned above, such as with just a link, the link will not work unless you have already shared the video with the user and they are logged into Google.